Writing Functions in Python— A Beginner’s Guide
In this guide, I discuss the benefits of writing functions in Python, provide practical advice for beginners who are learning to write them, and walk through an example.
In programming, a function is a block of reusable code designed to perform a specific task or set of related tasks. They typically allow for different information to be fed into them, in the form of arguments, and execute the task using those inputs in some way, often creating an output at the end. Functions may perform one simple task, such as applying a basic mathematical formula to a set of numbers, or a complex task consisting of many related steps, such as fitting a machine learning model to a large dataset.
My primary piece of advice when writing functions is to start simple, and let your actual usage of the function over time dictate updates for flexibility, complexity, and error handling.
Some of the technical best practices and all of the examples are specific to Python, but many of the general recommendations would be applicable to other object-oriented programming languages as well.
First, why write functions?
The most common reason you’ll hear for why you should write functions is that it makes your code “reusable”. The implication is that this is primarily to save time, which of course it does if you had to actually recreate the code from scratch each time you wanted to use it. But most development environments allow you to copy and paste code quite easily, and find-and-replace reduces some of the manual work.
As a beginner, it may seem easier and simpler copy/paste/replace rather than spend the time to write a function, especially if you’re writing code that you don’t intend to share with others, or that you think you’ll make use of only a few times. But here are some other advantages to functions that will hopefully illustrate why investing the time to write them is well worth it:
- Functions help you avoid careless errors you can easily make when performing your copy/paste/replace. Don’t shrug this one off: you can sink a lot of time troubleshooting an exception or incorrect result that turns out to be due to a single mis-placed letter or variable you forgot to update!
- You can easily apply your code repeatedly without having to deeply understand (or remember) how each step works. I don’t know about you, but I often feel like I only have a finite amount of mental capacity available to hold details in short term memory (like mental RAM, if you will). At a certain point, I have to offload some of these concepts or ideas (i.e. forget them or write them down) to make room for new ones. Functionizing code and testing it before moving on helps me free up mental capacity so I can reallocate it to other things. When I need to use the function next time I can just focus on passing the correct parameters as opposed to re-familiarizing myself with each step so I can replace the right variables. And of course, if you think someone else may want to run your code in the future, functions are a must so they never need to be concerned with the gritty details in the first place.
- Functions can be much more than just a block of sequential steps. By adding if/then or other logic to control the final output or how it’s calculated, you can basically ask your function to make decisions for you. As you use a basic function over time, you’ll find ways to add more complex logic to it to get more of what you need and less of what you don’t: you can essentially outsource your logic and save “future-you” the trouble of applying it. Updating this logic in one place as you gain insight and encounter edge cases helps make sure the latest, most evolved version can be applied consistently, even in sections of code you wrote previously. This concept may be a bit difficult to grasp just from an explanation, so I’ll revisit this when we walk through the example below.
My Mantra: Start simple, scale up
Don’t let yourself get intimidated by the complexity of functions you might see on the internet or in packages that you use. Just reading through the docstrings of more complex functions can be overwhelming with all the arguments they support and functionality they have, and as a beginner you may feel that you’ll never be able to write all that.
But the good news is you don’t have to. You can (and should) start small and simple, especially as a beginner. First, focus on writing a function that accomplishes a basic task that you’ll need to repeat in the future. Include the minimum parameters and logic needed to accomplish that task, accepting that it will inevitably have some flaws that you can work out later. As you use the function more, you’ll find yourself wishing it could be more flexible, or do more things, and you can iteratively update the function to add more parameters or logic as needed.

You can also think about writing a function as creating a tool to help you do a particular action.
If you need to drive a nail into a piece of wood, you might start with big flat rock to get the basic job done. It probably won’t take you too long to find a rock of the right size and shape, and once you find it you’ll be able to start using it to hammer nails right away.
As you drive in more nails (and as your tool-making skills develop over time) you’ll identify flaws and naturally come up with improvements such as adding a handle, using stronger and lighter materials, etc.
Eventually, you’ll have a tool that can not only drive nails in efficiently, but also pry them out so you don’t have to go digging through the toolbox if you make a mistake!
The more nails you hammer, the better you’ll understand if you need to refine the tool you have, or build another one altogether to handle its own separate, specialized task. Just as we have different hammers specialized for working with different materials (metal, brick and stone, wood, etc.), we create separate functions when the task we need to accomplish diverges significantly.
How to write a function: an example
Hopefully, you now agree that functions are very useful and are on board with the basic idea of starting simple and iterating to make improvements. Now, we’ll get into an example and I’ll provide my suggestions for how to go about writing your own functions.
We’ll walk through a function I initially drafted in my second-ever data science project, and have been updating over time. The goal of the function is to help visualize data distributions as part of exploratory data analysis for machine learning. We’ll use the King County Housing dataset from Kaggle.
This dataset contains information about houses sold in King County, WA, such as number of bedrooms and bathrooms, square feet of living space and lot, zip code, grade reflecting craftsmanship, etc. We can use this information to build a logistic regression to predict home price. But first, I want to explore the potential predictor variables to see their distributions, confirm whether they are normal or not, identify outliers I may need to consider removing, check for nulls or placeholder values I should investigate, and quantify how they are correlated with my target variable, price.
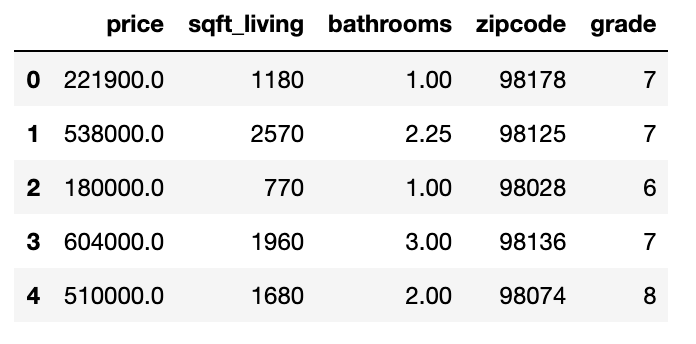
For this example, I’ll start with a subset of variables, shown at left. But there are about 15 predictors that I ultimately want to explore, so I know that I want to use a loop to get initial visualizations and exploratory statistics for all of the predictor columns in my dataframe at once.
I also know that I’m going to be doing this type of exploration frequently as a data scientist, so it makes sense to invest time in writing a function that I will be able to reuse on future projects.
1. Write and test code segments separately first
As you get more practice, it will become easier to write a function from scratch when you know up front you’ll need to reuse it. But to begin with, especially if your function is going to perform multiple steps and include if/then logic, it’s fine to write the code separately so you can more easily test and troubleshoot it. This makes it easy to try out and tweak each section of the code before combining them all into a single function.
print()ordisplay()variables as you go to make sure the code is doing what you need, and that you get the correct result in the end.- Since you know you’re ultimately going to be combining these steps, try to use consistent variable names to represent the same values or classes. For my initial draft below, I’ve starting with just two numeric columns,
bathroomsandsqft_livingand employed simpleforloops in each Jupyter Notebook cell. I used the variablecolconsistently to represent the name of the predictor column so it will be easy to combine the separate segments into a single function later.


It’s worth briefly returning to the concept I mentioned above: you can ask your function to make decisions about certain things so you don’t have to do it manually. The normality test code segment is a very simple example of coding a decision that I would otherwise have to make manually: in addition to printing the result of the test, I’m also having the code determine if the p-value is significant at an alpha level of 0.05, and telling me the result of that decision. Although I could actually make this decision quite easily myself by looking at the value, much more complex logic could be written for more nuanced decisions.
Now that I’ve got working code for each of the exploratory steps that I want to perform, I can combine them into a function.
2. Create the empty function
- Write the function definition using the format
def function_name():with empty parentheses (no parameters) to start with. Make sure to put a colon at the end.
It’s conventional in Python to use all lower-case letters for function names, and underscores to separate words.
- Add an empty multiline string using a set of triple quotes (
"""Example"""), as a placeholder for your docstring. We’ll come back to this later. - Add
return Noneto the end of your function body as a placeholder for the eventual stopping point. Thereturnkeyword is how we indicate the point at which the function will terminate and code execution will continue at the point where the function was originally called. Optionally, the function can pass a return variable or value back to the calling code, usually representing the fruits of its labor. We’re setting the output equal toNonefor now, and you can come back and update it later.
It’s not mandatory for functions to explicitly return a value. In this example, we could easily just print all the visualizations and statistics so we can read through them, and may not be interested in having our function actually return anything else. If you don’t include a
returnstatement at all,return Nonewill be implicit.I recommend including
return Noneas a placeholder to remind you to think carefully whether there is something you might want to return. If not, you can just leave as-is or remove it with no change in functionality.Also, keep in mind that you can have multiple
returnstatements if your function returns different values, or terminates from different branches of the logic tree depending the circumstances.
3. Copy your code into the function body
- Starting now, and continuing as you modify the function, be sure to add descriptive comments so you can easily skim through and find which tasks each section of code performs. You’ll be glad you did when you return to a function you wrote weeks or months ago and need to remember how it works to make an update! Just put a
#at the beginning of each comment line. - Remember that in Python, groups of statements like loops and functions need to be indented, and the indentation in the statements you coded separately may need to be adjusted.
It’s generally recommended to use a consistent number of spaces (2 or 4 spaces are common) instead of tab characters to indent code blocks. Tab characters may be interpreted in different ways, and mixing them with spaces for indentation will cause issues with code execution.
If you’re working in a Jupyter Notebook, you can use
tabfor indentation and by default it will automatically be converted to 4 spaces (you can also customize this setting). Jupyter Notebook will also maintain the appropriate level of indentation when you hit enter when writing within a block of code.This is great, since it keeps your code consistent and runnable outside Jupyter Notebooks, but still allows you to use
tabshortcuts to save time. You can select multiple lines of code and and usetabto indent the whole group one level, orShift + tabto de-indent the whole group by one level. The ability to use these shortcuts to indent or un-indent multiple lines of code at once is very useful when assembling code you wrote outside a function, and addingif/thenloops as your function becomes more complex.
4. Add parameters
Parameters are the values a function expects as inputs. They may represent variables to be updated or transformed, values to be used in calculations, or options indicating which tasks the function should or shouldn’t perform. Selecting which variables in the body of the function should be parameterized is key to having a flexible function that can be easily reused with varying inputs.
A note about the vocabulary: When we’re talking about the variables inside the parentheses of our function definition, we use the word parameters. When we’re talking about calling a function and passing variables to it, we use the word arguments. They refer to the same basic thing, but the word we use depends on the context.
While I’m writing a function and describing these variables from the function’s perspective, I’ll talk about the parameters the function will use to execute its task. Once I’m calling the function, I’ll refer to the arguments we pass in.
When considering which variables should be parameterized in your first draft, ask yourself:
- What will definitely change each time I run this? These should definitely become parameters.
- Is there anything I’ve hard-coded in my first draft that I might want to adjust in the future? These could become parameters up front, or you could also just assign values to variables at the top of the function, so you can easily assign them from parameters later.
In our example, I’m using predictor and target columns stored in a Pandas dataframe, and if I want to use this function on a different dataframe then I’ll definitely want that to be passed in. I also want to be able to explore a custom subset of predictor columns that will change each time I run the function, so I’ll create a pred_cols parameter for the list of predictor column names. And finally, although for this project my target will always be price, I want to use the function for future projects where the target will be named something else, so I should have a target parameter for that too.
def explore_predictors(df, pred_cols, target):
...- Add each parameter to the function definition, inside the parentheses. The names will be used not only to refer to that variable in the body of the function, but also as the keyword argument names when the function is called.
- Choose parameter names that aren’t too long, and will naturally bring to mind what they stand for. Shorter names will be easy to refer to throughout the function body and easier to refer to when calling the function.
- Use the same rules for naming parameters as for naming functions (all lower-case, with underscores to separate words).
- If there is a variable or value you’re using like a constant for now but think you might want to adjust later, add it as default parameter so you don’t have to specify it as an argument every time you call the function. To make a default parameter, assign a value to it in the function definition using the equals sign.
Any parameter not assigned a value in the definition (non-default) will be considered required. In
def my_func(input_a, input_b):,input_aandinput_bare both required because we haven’t assigned any values to them. If we tried to call this function with only one argument (such asmy_func('test')), we would get an error.If you assign default values to parameters, they will be optional to include as arguments when the function is called. Default parameters that are assigned values are usually placed at the end of the parameter list.
If we had the function
def my_func(input_a, input_b=True):,input_bwould be optional when the function is called because it has been assigned the default value ofTrue. We would only need to provide an argument forinput_aso calling this likemy_func('test')will work fine assuming we’re OK withinput_bhaving the default value ofTrue. However, we do still have the option to specify a value other than the default forinput_bif we want to, such as (my_func('test', False)).Using default parameters helps simplify calling a function, since fewer arguments need to be passed and someone calling the function doesn’t need to understand every single argument in order to get started. But for less common or more advanced functionality, the optional argument values still can be easily customized.
- Remember to keep things simple to start with and add more complexity and flexibility as needed. Start with just parameterizing what is obvious and necessary and don’t “boil the ocean” trying to think of every option you might ever want to specify.
Once you’ve decided which variables should be parameterized and chosen names for them, go through the function body be sure to replace the hard-coded values or previous variable names with the new parameters.
5. Code your return value (or not)
If your function was naturally designed to output a calculated value or object, just use this step to make sure you’re returning whatever that is at the end of the function. Replace the initial None placeholder with your final variable or expression.
If you’re building a function to print graphs or a report like in our example, consider whether returning a dictionary or dataframe of some of the information might also be helpful. In our example, the primary goal is to print visualizations and descriptive statistics of different predictors, but we’re also performing a normality test and calculating the Pearson correlation coefficient. Right now, we’re printing that information along with the graphs, but if I had a large number of columns I might want to compile the results in one place so I could filter or sort it instead of reading back through a bunch of printed statements.
For this example, I decided to add a few lines of code to compile some of the statistics and test result in a list of lists, and then convert that list to a dataframe that will be returned.
6. Test early and often
Now that we have the basics of our function coded, it’s time to test out the function and make sure it’s working as expected.
Test often as you’re building and editing a function.
It’s easier to to troubleshoot problems if you have a shorter list of things you’ve changed since it last worked.
- If you’re working in a Jupyter Notebook, make sure to execute the cell containing the function to load up its most recent version.
- If your function returns a value, don’t forget to set a variable equal to the output of the function when you call it, so you can capture the output.

Success! In addition to the graphs and printouts that I had coded earlier, now I also get a dataframe with a bunch of the statistics I calculated for each column, so I can easily review them without scrolling back through the graphs.
A note about the different ways you can pass arguments when calling a function:
When you pass arguments to a function, you can do so by keywords, or by position. Passing arguments using keywords means that you include the parameter name as well as the value or variable, using an equals sign to connect the argument value with the proper function parameter. Here’s an example of passing arguments by keywords:
explore_predictors(df=df, pred_cols=['sq_ft_living', 'bathrooms'], target='price)The benefit of using keywords include:
- It’s easy to tell which value each argument is being passed to
- The keyword arguments can be in any order, since the argument names are specified
If you pass arguments positionally, you don’t include the names, but you must pass them in the order in which they occurred in the function definition. Without the keywords, the compiler relies on the order to match up the argument values with the function parameters.
I generally recommend passing arguments using keywords because I think it makes code more readable and I like the flexibility of being able to pass them in any order (makes it easier to add another argument to the end of the list, if needed). But ultimately it’s up to you!
7. Add a docstring (even just a basic one)
A docstring is a block of text that you add as the very first thing after the function definition. Docstrings explains what the function does, what arguments it takes, and what it outputs, and can also include other helpful info such as code examples. They’re an easy way for the author of the function, who is the expert on what it does and how it works, to provide built-in instructions to anyone who might want to use it.
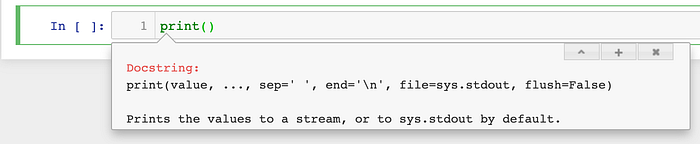
In a Jupyter Notebook, you can show the docstring for a built-in Python function by typing the name of the function, then the opening parentheses, then Shift + tab on your keyboard. This initially shows the beginning of the docstring, but you can click the + button to show a deeper pop-up, or the ^ button to open a separate container on the bottom of the notebook that is easier to scroll through.
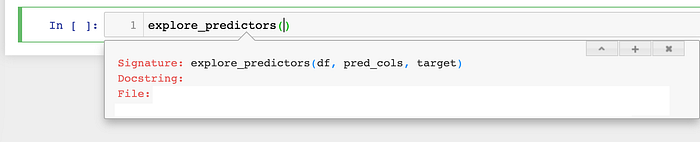
The function signature (the names of the arguments and the order in which they occur) is automatically pulled up when you summon the docstring even if you haven’t added anything manually, but without any further explanation it would be difficult for anyone else to know what the function does. Even future-you who may want to use this function a few months from now will appreciate a reminder on what it does and what to pass as each argument!
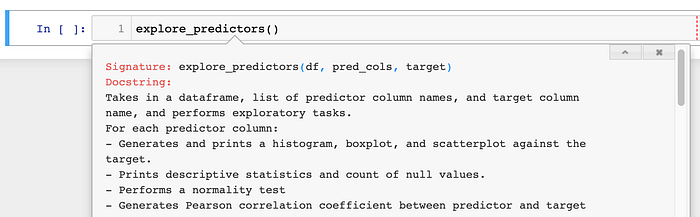
You don’t have to write a novel, but I highly recommend creating a docstring in your first draft that includes at least these basics:
- A brief summary of what the function does
- A list of the parameters/arguments including name, data type(s) accepted, whether it’s optional or required, and brief description of what the value or object should represent
- A description of what the function returns, if anything
- If there is anything you specifically know your function does NOT support yet, include that information as well
See the PEP docstring conventions here for more best practices.
8. Improve your function iteratively, as needed
At this point we’ve made a basic function for exploring data by showing visualizations and statistics and running a normality test. I’ve tested it on a few of my predictor columns, and confirmed it works.
The real next step is just to use your function for a while and be open to identifying room for improvement.
I initially developed this example function using just two predictor columns, both of which were continuous numeric variables. The df.describe() method proved useful, and I gained valuable insight into these types of variables by plotting a histogram, boxplot, and scatterplot against the target. But if I also have categorical variables or binary variables, I probably need to use other methods to understand the distribution of the values and how they relate to the target.
By keeping my first draft simple I was able to get a working and useful function up and running fairly quickly, but at the cost of having a fairly narrow scope that may not work on future data sets.
In real life, I went back and updated the initial function a whole bunch of times to incorporate support for different types of data I encountered, and make the output more flexible. Here’s a list of some of the things I eventually updated, so you can get a sense for just how much more I added after the first draft:
- Added logic to evaluate what type of data was in each column (continuous or categorical) based partly on column type in the dataframe but also on the number of unique values
- Depending on data type, generated different types of graphs and statistics (
df.value_counts()instead ofdf.describe()) for what the function judged were categorical. - Added
True/Falseparameters for each type of chart to allow them to be turned off, which involved having to make the number of axes in the figure be calculated dynamically - Added dynamic sizing for the matplotlib figure to allow the barplot for categorical variables to show all values even if they had high cardinality
It did take some work, but I ended up with a robust function that can handle lots of different types of data, and that I can easily reuse in many data science projects to come!
The approach of starting simple and building iteratively means you don’t have to get overwhelmed trying to think of every exception or scenario in the beginning: start with the basics and let your own usage of the first draft guide what you add in the second draft and beyond.
Conclusion
Hopefully you found this example helpful, and are excited about writing your own Python functions! Here are the steps again, to sum everything up:
- Write and test code outside the function first
- Create the basic function outline
- Fill in the function body with your separate, previously-tested code segments
- Define parameters and replace them in the function body
- Code the return value (or not)
- Test early and often
- Add a basic docstring
- Use the function and update it iteratively based on what you learn
Additional Recommendations
- As you gain more experience, look into exception handling that you can incorporate into your functions to get past unexpected errors and provide the user with useful information if something needs to be corrected.
- It’s often useful to add logic to your functions so they can support different types of inputs and outputs, or perform a selected subset of tasks from a larger menu. Just don’t forget that sometimes when you encounter a task your function doesn’t currently support, the right approach might be to create a separate function instead of trying to tack more onto an existing one. If you find yourself struggling trying to combine tasks with very different inputs or outputs into a single function, there’s a good chance the right answer is a separate function altogether.
- Don’t forget that you can call functions inside a function! If you find yourself copy/paste/replacing within your function to accommodate different scenarios, consider a function for just that chunk of code.